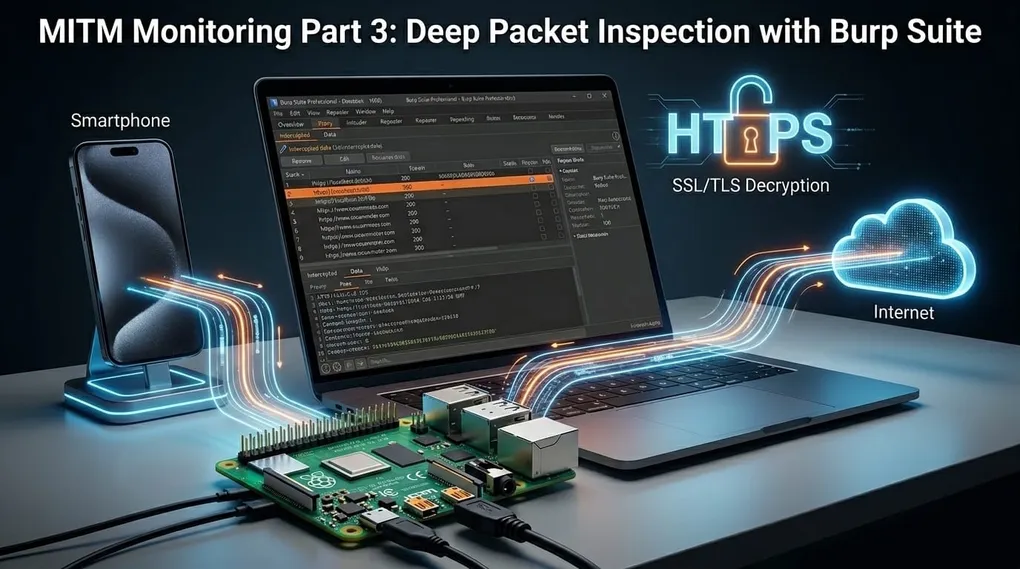
Integrating Burp Suite for Advanced MITM Monitoring
In the first two parts of the series, a Raspberry Pi was configured as a robust network monitoring station.
Part 1, established routing and monitoring on the Ethernet interface.
Part 2, introduced a dedicated Wi‑Fi Access Point, enabling IoT devices to connect and be monitored without cables.
However, observing raw packet flows with tcpdump or Wireshark encounters a fundamental limitation: encryption. In contemporary networks, the majority of traffic is carried over HTTPS, which obscures application‑layer behavior and hinders interpretation of device activity.
To enable interception and interaction with HTTP/S requests, two proxy approaches are available: an explicit proxy and a transparent proxy. The explicit proxy is the simpler and more robust option, as it avoids routing complications and preserves TLS handling. However, it requires clients to be proxy‑aware, a condition commonly met by PCs and smartphones but often absent in many IoT devices.
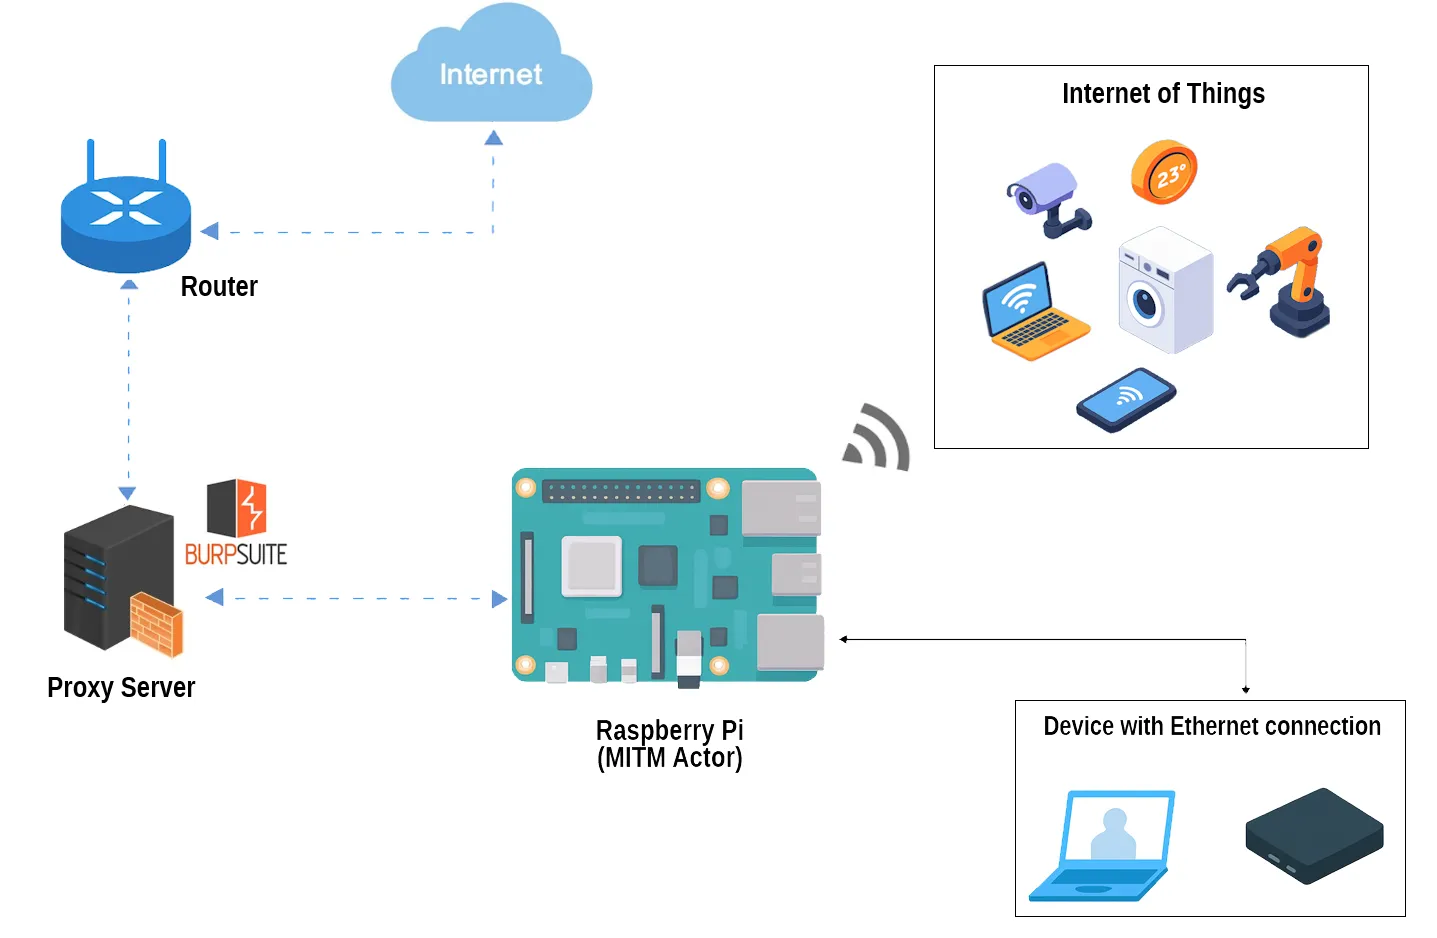
In this article, for broader coverage and compatibility with different target devices, a transparent proxy will be implemented on the same network as wlan0. This configuration intercepts all HTTP traffic (port 80) associated with the wlan1 and eth0 interfaces and forwards it to Burp Suite for inspection and manipulation. Decrypting HTTPS traffic requires an additional step: generating Burp’s Certificate Authority (CA) and installing it on the test clients, since clients will otherwise reject the MITM connection as untrusted.
Mastering these configurations elevates passive monitoring into a capable platform for thorough security analysis.
1. Burp Suite configuration on the host machine
The host running Burp must be reachable from the Raspberry Pi via wlan0: in other words, the proxy and the Raspberry’s wlan0 interface must reside on the same subnet. In this example, the Burp host uses IP 192.168.2.62 while the Raspberry’s wlan0 (the interface handling Internet access) is 192.168.2.108.Burp should be configured to accept remote/invisible connections and to listen on 192.168.2.62 (or on all interfaces) using a dedicated port (for example 8080). If supported by the Burp version in use, enabling invisible proxy is recommended so Burp can receive requests that are not in explicit proxy format; this feature is useful for DNAT‑based transparent proxying. Additionally, the firewall and routing rules must permit connections from the Raspberry and from clients on the wlan1 and eth0 subnets to the Burp host IP.
To verify that the host is listening on the chosen port, run the appropriate command for the platform:
# Windows
netstat -an | findstr :8080

# Linux
ss -ant | grep :8080
Expected output is 0.0.0.0:8080 or 192.168.2.62:8080 in LISTEN state. Do not be surprised if the Raspberry cannot ping the Burp host at this stage: ICMP and TCP are handled separately by firewalls. For example, Windows may block ICMP while leaving TCP port 8080 open.
To confirm TCP reachability to Burp, issue an HTTP request through the proxy:
curl -x http://192.168.2.62:8080 -k https://google.itIf the request appears in Burp, TCP connectivity to the proxy is functioning even if ICMP ping fails.
Decrypting HTTPS requires generating Burp’s Certificate Authority (CA) and installing it on the test clients: without the CA, clients will reject the MITM connection as untrusted.
2. Routing rules for the Raspberry
On the Raspberry side, the first step is to ensure it has connectivity to the proxy and that it is using the correct interface (wlan0 as the upstream). Useful commands for an initial reachability check are:ip addr show
ip route show
ping -c 4 192.168.2.62
nc -vz 192.168.2.62 8080
curl -v http://192.168.2.62:8080/ || trueThe ping to the proxy may fail, as noted previously. The nc command tests a TCP port (requires netcat).
We now reach the crucial part of the configuration: applying DNAT (Destination Network Address Translation) on the Raspberry. DNAT is a networking technique that changes the destination IP address of an IP packet as it traverses a router or firewall. In this specific context, DNAT will make the Raspberry send its traffic to the proxy (Burp) while still believing it is contacting the legitimate website directly (without explicitly using a proxy).
To apply DNAT we will use UFW. Specifically, edit **/etc/ufw/before.rules and add:
# DNAT for Burp (redirect HTTP from wlan1/eth0 to Burp)
-A PREROUTING -i wlan1 -p tcp --dport 80 -j DNAT --to-destination 192.168.2.62:8080
-A PREROUTING -i eth0  -p tcp --dport 80 -j DNAT --to-destination 192.168.2.62:8080
making it as follows:
# NAT table rules
*nat
:PREROUTING ACCEPT [0:0]
:POSTROUTING ACCEPT [0:0]

# Masquerade LAN eth0 → WAN wlan0
-A POSTROUTING -s 10.10.10.0/24 -o wlan0 -j MASQUERADE

# Masquerade LAN wlan1 → WAN wlan0
-A POSTROUTING -s 192.168.50.0/24 -o wlan0 -j MASQUERADE

# DNAT per Burp (redirect HTTP da wlan1/eth0 a 192.168.2.62:8080)
-A PREROUTING -i wlan1 -p tcp --dport 80 -j DNAT --to-destination 192.168.2.62:8080
-A PREROUTING -i eth0  -p tcp --dport 80 -j DNAT --to-destination 192.168.2.62:8080

COMMIT

# Don't delete these required lines, otherwise there will be errors
*filter
.....
With these rules, the Raspberry takes every packet arriving on interfaces wlan1/eth0 destined for port 80 on any given IP and redirects it to port 8080 on the IP where the proxy (Burp) is running.
To apply the changes, refresh UFW with the following commands:
sudo ufw allow ssh
sudo ufw disable
sudo ufw enable
sudo ufw status verbose
3. Intercepting and Decrypting HTTPS Traffic
Intercepting HTTPS traffic (port 443) is significantly more complex than standard HTTP due to the implementation of TLS/SSL encryption. If Burp Suite merely captures the packets, it will only see encrypted data. To analyze this traffic, the end-to-end chain of trust must be broken by positioning Burp Suite as an intermediate interpreter. This is achieved through a dual handshake process:- Client Side (Raspberry Pi ↔ Burp Suite): Burp intercepts the request and masquerades as the destination server, generating a spoofed certificate (for example, for google.com) to present to the Raspberry Pi. Normally, the Raspberry Pi’s operating system would reject this certificate as invalid. To resolve this, the Burp CA certificate must be exported and installed into the Raspberry Pi’s Trusted Root store. Once installed, the system will trust and accept any certificate signed by Burp.
- Server Side (Burp Suite ↔ Web Server): simultaneously, Burp establishes a separate, independent connection to the actual web server, acting as the client itself.
To enable this decryption and interception, several configurations must be performed.
3.1 - UFW Configuration for Port 443
To capture HTTPS traffic, additional rules for port 443 must be added to the /etc/ufw/before.rules file. These should be placed immediately after the existing rules for port 80:
*nat
:PREROUTING ACCEPT [0:0]

# HTTP Redirection from wlan1/eth0 to Burp Suite
-A PREROUTING -i wlan1 -p tcp --dport 80 -j DNAT --to-destination 192.168.2.62:8080
-A PREROUTING -i eth0 -p tcp --dport 80 -j DNAT --to-destination 192.168.2.62:8080

# HTTPS Redirection from wlan1/eth0 to Burp Suite
-A PREROUTING -i wlan1 -p tcp --dport 443 -j DNAT --to-destination 192.168.2.62:8080
-A PREROUTING -i eth0 -p tcp --dport 443 -j DNAT --to-destination 192.168.2.62:8080

COMMIT
As with previous steps, these modifications are persistent and will be automatically applied whenever UFW or the system is restarted.
3.2 - Exporting the Burp CA Certificate
To enable the decryption of HTTPS traffic, the Burp Suite Certificate Authority (CA) must be obtained from the host machine. This CA is responsible for signing the dynamic certificates generated by the proxy for each intercepted domain.
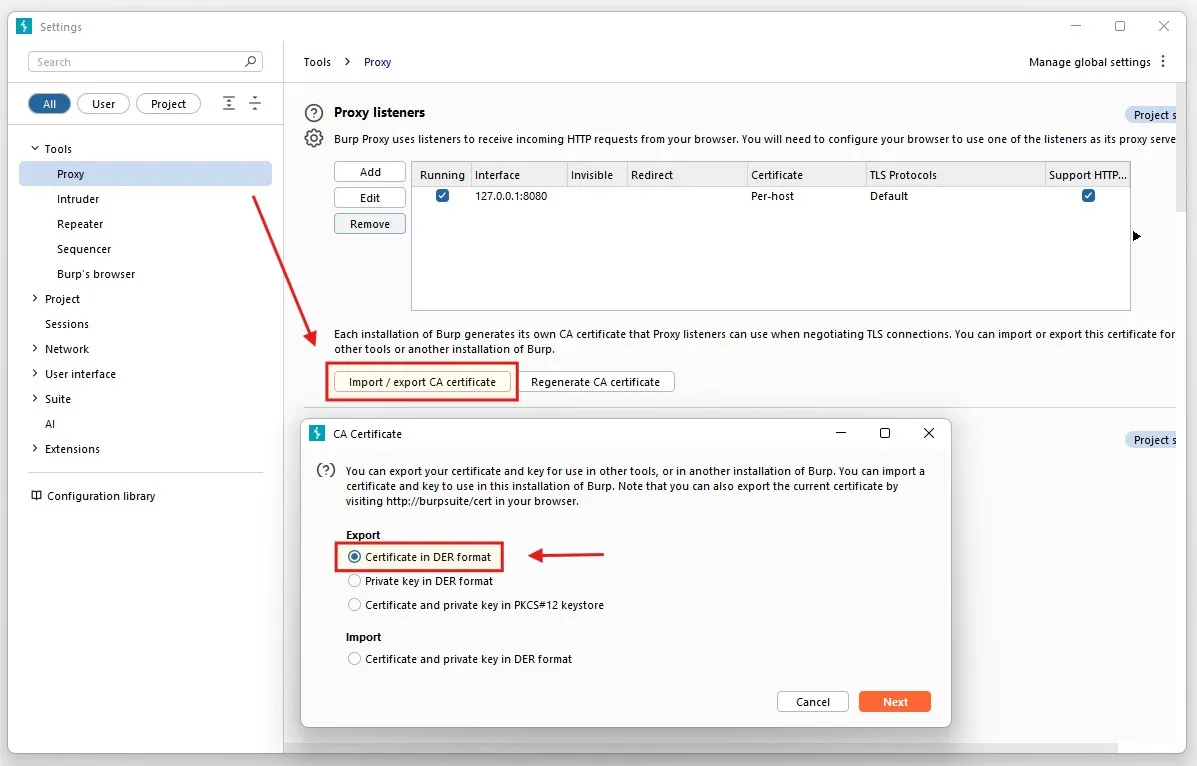
The first step involves obtaining the CA certificate from the host machine where Burp Suite is running:
Burp Suite -> Proxy -> Proxy Settings -> Proxy listeners -> Import / export CA certificate -> Certificate in DER format
3.3 - Understanding the Trust Chain and Certificate Installation
A critical aspect of the MITM architecture is the establishment of trust. Since the TLS handshake occurs directly between the target client and Burp Suite, the Burp CA certificate must be must be correctly integrated/installed into the trust store of the target operating system(for example, smartphone, IoT device, laptop, etc) that originate the traffic.
Below is a detailed technical breakdown of the installation process for the major platforms.
🔍 In-depth: Android
The certificate file (burp.der or burp.crt) must be copied to the device’s internal storage and installed via Settings → Security → Encryption & credentials → Install from storage (menu labels may vary by manufacturer). When prompted, select the certificate and install it as a VPN and apps credential or as a CA certificate.
Note for Android 7.0 (API level 24) and later: modern Android apps do not trust user‑installed CA certificates by default. To intercept traffic from specific apps, either configure those apps to accept user CAs via a custom network_security_config.xml, or move the certificate into the system trust store (which requires root access).
🔍 In-depth: iOS
The installation on iOS is a two-stage process. First, the certificate must be downloaded (usually via Safari or sent as an email attachment), which triggers a “Profile Downloaded” notification. The user must then navigate to Settings → General → VPN & Device Management to install the profile. Second, and most critically, the certificate must be manually granted full trust. This is done by navigating to Settings → General → About → Certificate Trust Settings and toggling the switch for the Burp CA under “Enable full trust for root certificates”.
🔍 In-depth: Microsoft Windows
The certificate file must be imported into either the Local Computer or Current User certificate store. Open the Certificate Manager (certmgr.msc) or double‑click the certificate file to launch the Certificate Import Wizard, then follow the prompts.
The certificate must be placed specifically in the Trusted Root Certification Authorities. Installing the certificate in the “Personal” or “Intermediate” stores will cause TLS validation to fail during the handshake.
🔍 In-depth: macOS
The Keychain Access utility is used for certificate management. The certificate file should be dragged into the “System” keychain. Once imported, the certificate will initially appear as “Not Trusted.” To resolve this, the user must double-click the certificate, expand the “Trust” section, and change the setting for “When using this certificate” to “Always Trust”. This ensures that Safari, Chrome, and system-level services accept the proxy’s intercepted traffic.
Following the installation of the certificate on the target device, the success of the interception can be verified by observing the Proxy → HTTP history tab in Burp Suite. If the configuration is functional, HTTPS requests will appear in plaintext, allowing for the full inspection of headers and application-layer payloads that were previously encapsulated within the TLS tunnel.
3.4 - Certificate Installation on the Raspberry Pi (optional)
To intercept also the traffic generated locally by the Raspberry Pi (such as updates or CLI-based requests), the certificate must be added to the system’s trust store.
Since the Raspberry Pi (and most Linux-based systems) requires certificates in a specific format the exported file must be firstly trasferred to the Raspberry and then converted from .der file to the .crt format (a standard for the local certificate store) using:
openssl x509 -inform der -in burp.der -out burp.crtAt this point, move the certificate to the local CA directory and update the system trust store:
sudo cp burp.crt /usr/local/share/ca-certificates/
sudo update-ca-certificates
The command output should confirm the addition of one new certificate.
4. Technical Limitation and Security Measures
Despite a correct configuration, HTTPS interception may be obstructed by device limitations and advanced security mechanisms.Many IoT devices operate inside closed ecosystems with proprietary, read‑only firmware and no administrative interface or command‑line access for managing the root certificate store. In many instances, trust anchors are hardcoded directly into the hardware, preventing the device from being configured to recognize a third-party proxy Certificate Authority (CA). When such a device encounters a proxy-generated certificate during a TLS handshake, it identifies the discrepancy as a fundamental security violation. Consequently, the device will immediately terminate the connection to prevent a perceived breach, leading to a complete loss of network connectivity rather than the intended decryption of traffic.
Other times, high-security mobile applications and sophisticated hardware often employ Certificate Pinning to shift the validation process from the operating system directly to the application layer. By hardcoding a specific public key or certificate within the application binary, the software effectively bypasses the system’s global trust store. Even if the Burp CA is successfully installed at the OS level, a pinned application will still reject the proxy connection because the presented certificate does not match its internal (and immutable) requirements. Overcoming this level of protection necessitates advanced binary instrumentation, such as using Frida to modify the application’s logic at runtime, which is a significantly more invasive process. In the presence of these advanced security measures, the intercepted traffic remains encrypted and unreadable at the application layer. Only network-layer (including destination IP addresses and DNS queries) remains visible for analysis.