
MITM Monitoring using a Raspberry Pi
Assuming a Raspberry Pi running a compatible Linux distribution (Ubuntu, Raspbian or similar), this article explain how to configure the device as a man‑in‑the‑middle (MITM) monitor to observe traffic from any client connected to its LAN port. By connecting the Raspberry’s Wi‑Fi interface to an Internet connected router, the device sits between the router and the target client (for example, a PC or an IoT device), capturing and analysing packets on the Ethernet link. Captured traffic can be inspected and recorded by monitoring tools and then forwarded to the upstream router via the wireless uplink. This setup is useful for studying smart‑device behaviour, verifying whether data is transmitted in clear text and identifying contacted services and endpoints. It is intended for developers and security analysts performing authorised and controlled testing.
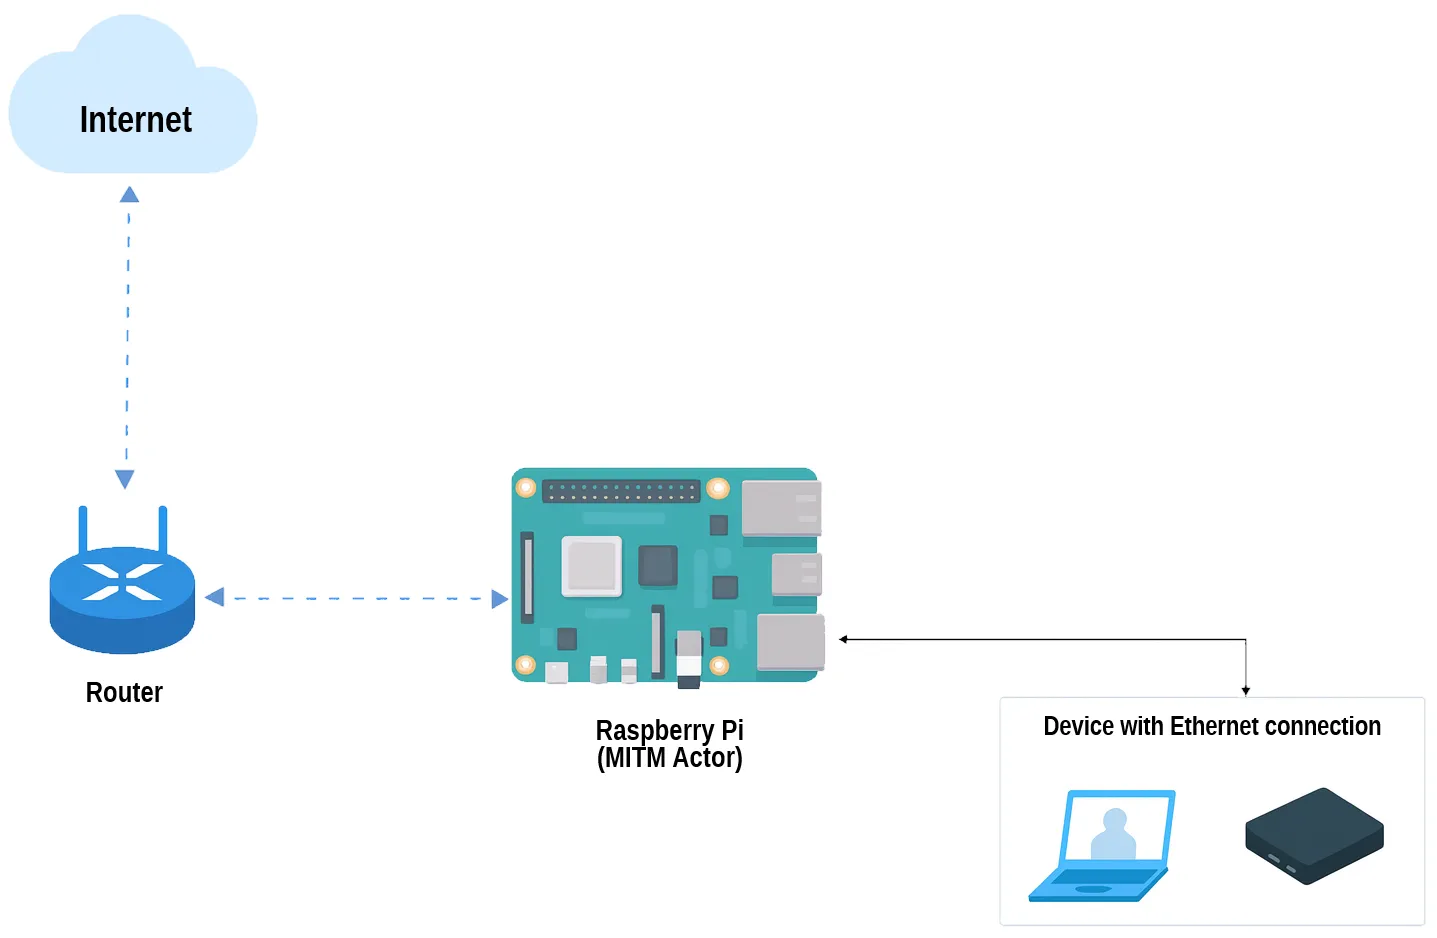
1. Connecting Raspberry Pi to Internet
The first step is to connect the Linux server to a WiFi network using NetworkManager and its command-line client, nmcli. To avoid conflicts with Netplan, ensure the system is configured to use NetworkManager as the renderer. If Netplan is present, it must be configured to delegate management to NetworkManager:ls /etc/netplanIf any .yaml files are present, remove them or edit them so that the “renderer” line reads:
renderer: NetworkManagerAfter this preliminary phase, list the network interfaces recognized by the kernel:
ls /sys/class/netTo quickly connect the device to a Wi‑Fi network, run:
sudo nmcli device wifi connect "SSID_name" password "password" ifname wlan0This command creates a connection profile and immediately attempts to connect to the specified access point. Alternatively, create an explicit profile with the desired parameters (SSID, security method, IPv4/IPv6 settings) and then activate it:
sudo nmcli connection add type wifi ifname wlan0 con-name SSID_name-Profile ssid "SSID_name"
sudo nmcli connection modify SSID_name-Profile i wifi-sec.key-mgmt wpa-psk wifi-sec.psk "password" ipv4.method auto autoconnect yes
sudo nmcli connection up SSID_name
This approach is useful when the profile needs to be modified later (for example, to set DNS or a static IP) without altering the active connection. After applying the connection, verify its status:
nmcli device status
nmcli connection show --active
ip addr show wlan0
These commands confirm that NetworkManager has associated the wlan0 interface with the specified wireless network, that the profile is active, and that an IP address has been assigned via DHCP (or a static address, if configured).
2. DHCP Server configuration
A static LAN address must be assigned to the Raspberry Pi’s Ethernet interface (for example, 10.10.10.1/24) and a DHCP server (isc-dhcp-server) must be run on that interface to provide IP addresses to devices connected via Ethernet. The Wi‑Fi interface (wlan) remains connected to the external network and acts as the uplink to the Internet.
sudo apt update
sudo apt install isc-dhcp-server
The isc-dhcp-server package provides the DHCP daemon commonly used on Debian/Ubuntu systems and enables automatic assignment of IP addresses, gateways and DNS to clients on the Ethernet port. This will allow us to have a DHCP server running on the Raspberry Pi and therefore automatically assign IP addresses, gateways and DNS to clients connected via the Ethernet port.
🔍 In-depth
After installation, if the active renderer on the system is NetworkManager (as in this case), it’s best to manage the static eth0 address with nmcli (or at most with its text-based interface, nmtui) because these tools communicate directly with the daemon that controls the connection status. NetworkManager is actually a system daemon (i.e., a system process that runs in the background) and is responsible for maintaining consistent network configuration across the graphical interface, services, and scripts.
Before the advent of Netplan (a network configuration abstractor), configuring the network on Linux often meant manually editing different files and using inconsistent tools depending on the card or service. Netplan instead introduced an abstraction layer that allows you to describe the desired network behavior in a readable format (YAML) and then delegate execution to a renderer. Netplan doesn’t directly affect the hardware: it reads the files in /etc/netplan/*.yaml and instructs the chosen renderer what to do. The most common renderers are NetworkManager (typical for desktops because it manages Wi-Fi, VPN, and user profiles) and systemd-networkd, which is lighter and preferred on servers or headless devices where a graphical interface isn’t needed. In practice, if a system is set up to use NetworkManager, using nmcli is preferable because it avoids conflicts and ensures that changes are immediately recognized and handled by the daemon that already controls the interfaces. If you’re working on a server or prefer a declarative approach, it’s best to write the Netplan file and let the networkd renderer apply the configuration.
Let’s create a new Ethernet connection profile with a static IP (including DNS and optional gateway):
sudo nmcli connection add type ethernet ifname eth0 con-name static-eth0 ipv4.addresses 10.10.10.1/24 ipv4.gateway 10.10.10.254 ipv4.dns "8.8.8.8,8.8.4.4" ipv4.method manual autoconnect yesIf no gateway is required, simply omit “ipv4.gateway”. In this case:
sudo nmcli connection add type ethernet ifname eth0 con-name static-eth0 ipv4.addresses 10.10.10.1/24 ipv4.dns "8.8.8.8,8.8.4.4" ipv4.method manual autoconnect yesVerify the connection and the assigned address:
nmcli device status
nmcli connection show static-eth0
ip addr show eth0
At this point, to ensure that the DHCP server daemon ( isc‑dhcp‑server ) knows which interface to listen on, specify the interface by editing the startup configuration:
sudoedit /etc/default/isc-dhcp-serverInside that file, set the IPv4 interface variable:
INTERFACESv4="eth0"
#INTERFACESv6=""
💡 Tip
The heart of the DHCP server configuration lies in the /etc/dhcp/dhcpd.conf file, which we’ll now configure according to our needs. Before making any changes, however, it’s a good idea to create a copy (so you can undo it if necessary): sudo cp /etc/dhcp/dhcpd.conf /etc/dhcp/dhcpd.conf.bak
Now, insert or replace the following minimal configuration in (/etc/dhcp/dhcpd.conf):
# Global settings
option domain-name "local";
option domain-name-servers 8.8.8.8, 8.8.4.4;
default-lease-time 600;
max-lease-time 7200;
ddns-update-style none;
authoritative;

# Subnet served by eth0 (Raspberry)
subnet 10.10.10.0 netmask 255.255.255.0 {
  range 10.10.10.2 10.10.10.254;
  option subnet-mask 255.255.255.0;
  option routers 10.10.10.1;
  option broadcast-address 10.10.10.255;
}
To make sure that the file just edited is syntax correct:
sudo dhcpd -t -cf /etc/dhcp/dhcpd.confFinally, physically connect the client (PC, IoT device) to the Ethernet port and start and verify the DHCP service:
sudo systemctl restart isc-dhcp-server3. Let’s make the Raspberry Pi a router
The Raspberry Pi is configured as a router/NAT connecting two networks: the LAN (eth0) and the WAN (wlan0). The DHCP server is already able to assign addresses to clients on the LAN, but it still doesn’t allow those clients to go out onto the Internet by routing and masking (NAT) traffic through the WAN. To enable this functionality, perform the following steps:- Enable persistent IP forwarding in the kernel
- Configure NAT to translate LAN addresses into WAN addresses
- Set firewall rules to allow required traffic and block the rest.
The first step consist into enable persistent IPv4 forwarding by adding or uncommenting the following line in /etc/ufw/sysctl.conf:
net/ipv4/ip_forward=1 .🔍 In-depth: UFW
This file is provided precompiled and commented (or empty on some distro) and is read by UFW to apply any specific sysctl settings. UFW (Uncomplicated Firewall) is the default firewall interface on Ubuntu Server and acts as a simplification for iptables , a very powerful but yet equally complex tool. UFW’s main job is to decide which traffic can enter or exit our server.
However, keep in mind that UFW may not be installed by default (for example, in the case of minimal systems such as those designed for Raspberry Pi), so before proceeding, let’s install/update it using:
sudo apt install ufw -y
Apply the change and verify the kernel setting:
sudo sysctl -p /etc/ufw/sysctl.conf
sysctl net.ipv4.ip_forward
# expected output: net.ipv4.ip_forward = 1
Allow SSH through the firewall before enabling UFW:
sudo ufw allow ssh⚠️ Caution
It’s very important to perform this last step now (before enabling ufw) so as not to destroy the SSH connection we initially established. Otherwise, we would be cut off from the Raspberry Pi!
Only now, enable UFW and check its status:
sudo ufw enable
sudo ufw status verbose
Now let’s enable NAT from UFW. Edit /ect/ufw/before.rules and insert the NAT block before the *filter section:
# NAT table rules
*nat
:POSTROUTING ACCEPT [0:0]
# Masquerade LAN -> WAN
-A POSTROUTING -s 10.10.10.0/24 -o wlan0 -j MASQUERADE
COMMIT
Set the forwarding policy DEFAULT_FORWARD_POLICY= “ACCEPT” in /etc/default/ufw and reload UFW to apply the changes:
sudo ufw disable
sudo ufw enable
sudo ufw status verbose
At this point the Raspberry Pi functions as both a DHCP server and a router, forwarding traffic between devices connected to its Ethernet port and the upstream Internet gateway. This configuration enables the device to act as a transparent intermediary for monitoring, debugging, or network traffic analysis. Operationally, to display a live capture of traffic on the eth0 interface:
sudo tcpdump -i eth0However, capturing traffic passing through the eth0 interface can also be done by saving everything in a file /tmp/test.pcap :
sudo tcpdump -i eth0 -w /tmp/test.pcapInstead if multiple devices are connected and is needed to limit the capture to a specific IP address:
sudo tcpdump -i eth0 host 10.10.10.2 -w /tmp/device.pcapAlternatively, use tshark for a filtered capture and text output:
sudo tshark -i eth0 -f "host 10.10.10.2" -w /tmp/device.pcap
sudo tshark -r /tmp/device.pcap -Y "http" -T fields -e ip.src -e http.host
The configuration changes described above are persistent and survive reboots, without risking losing the obtained functionality.
💡 Tip
Upon reboot, it might be useful to verify what we just said. To do so, we’ll use the following commands:
# DHCP
sudo systemctl status isc-dhcp-server
sudo journalctl -u isc-dhcp-server --no-pager -n 200

# Forwarding
sysctl net.ipv4.ip_forward

# UFW / NAT
sudo ufw status verbose
sudo iptables -t nat -L -n -v
sudo iptables -L -n -v

# Check that there are no residual processes
ps aux | grep '[d]hcpd' || echo "no dhcpd running"