
MITM Monitoring using a Raspberry Pi - part 2
This second article on Raspberry Pi–based MITM monitoring describes how to add a Wi‑Fi access point that target devices can use instead of the Ethernet port.
It is recommended to read the first part before continuing.
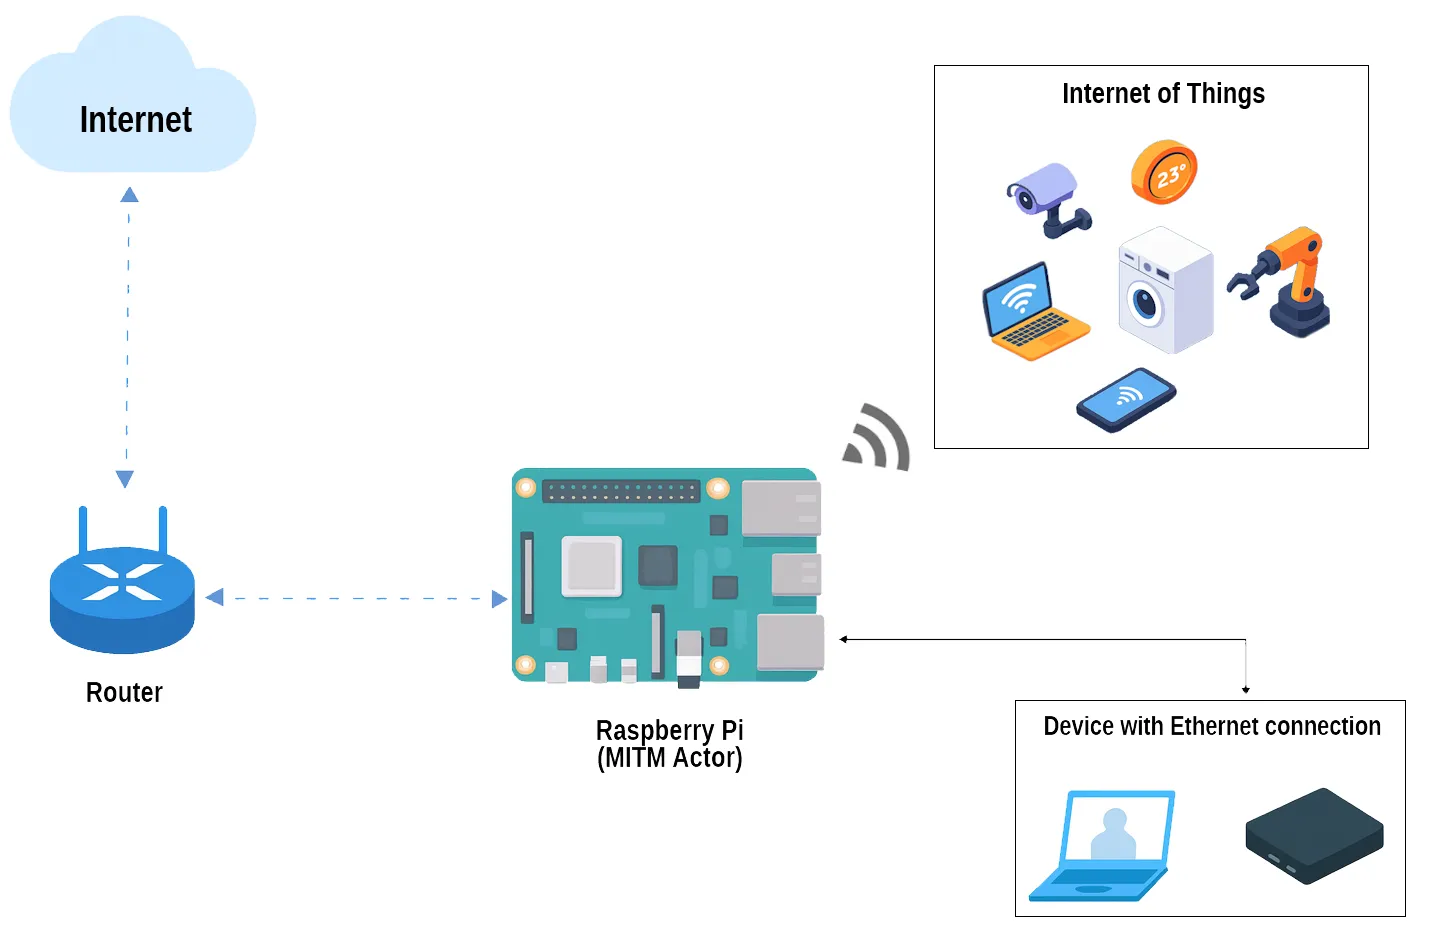
4. Creating a Wi‑Fi Access Point for MITM monitoring
An additional USB Wi‑Fi interface must be connected to the Raspberry Pi to create an access point(AP).The resulting setup uses wlan0 as the client interface connected to the real Wi‑Fi router (providing Internet to the Raspberry Pi), while wlan1 becomes the local Access Point serving wireless devices. As with the eth0 interface, wlan1 must use the Raspberry Pi’s internal DHCP service and forward/NAT traffic toward wlan0. Before applying any new configuration, create backups of the network settings applied in previous steps and verify the available network interfaces:sudo cp /etc/dhcp/dhcpd.conf /root/dhcpd.conf.backup
sudo iptables-save > /root/iptables.backup
ip addr show
ip route show4.1 - Enable NAT in UFW for wlan1 as well.
IP forwarding has already been enabled previously, so those steps are not repeated here. The remaining task is to enable NAT in UFW. Edit /ect/ufw/before.rules and insert the NAT block before the *filter section. The NAT rules previously added for eth0 must be extended to include wlan1. For example:
# NAT table rules
*nat
:POSTROUTING ACCEPT [0:0]

# Masquerade LAN -> WAN (eth0)
-A POSTROUTING -s 10.10.10.0/24 -o wlan0 -j MASQUERADE

# Masquerade LAN -> WAN (wlan1)
-A POSTROUTING -s 10.10.11.0/24 -o wlan0 -j MASQUERADE

COMMIT
Persistent IPv4 forwarding must be enabled by adding or uncommenting the line #net.ipv4.ip_forward=1.
4.2 - Installing and configuring the Access Point daemon.
To create an access point (AP), install hostapd (Host Access Point Daemon), a program that converts a standard Wi‑Fi network adapter into a wireless Access Point or an authentication server. It supports WPA2 and WPA3, AES encryption and RADIUS authentication for enterprise networks.
sudo apt install hostapdDo not start the service immediately; the daemon must be configured first. On many distributions (for example Raspberry Pi OS or Ubuntu) the package attempts to start automatically after installation. For safety, disable the related services:
sudo systemctl unmask hostapd  # -> Removes any mask on the hostapd service so that the service can be started (manually or as a dependency).
sudo systemctl disable hostapd  # -> Prevents the hostapd service from starting automatically at boot.
sudo systemctl stop hostapd  # -> Attempts to stop the running hostapd process immediately
Then, create the hostapd configuration file (or edit it if it already exists) at /etc/hostapd/hostapd.conf adding the following parameters:
interface=wlan1
ssid=IoT_Monitor_AP
hw_mode=g
channel=6
wpa=2
wpa_key_mgmt=WPA-PSK
wpa_passphrase=choose_a_password
rsn_pairwise=CCMP
country_code=IT
This configuration defines a Wi‑Fi network on wlan1 with SSID IoT_Monitor_AP, operating under IEEE 802.11g at 2.4 GHz on channel 6 (2437 MHz) to avoid the commonly used channels 1 and 11. Security is provided by WPA2 (IEEE 802.11i) with AES encryption; authentication is handled via a pre‑shared key (PSK) rather than an external server. Setting the country code ensures compliance with local frequency regulations and improves signal stability. It is advisable to start from this basic configuration. Additional option can be added later, for example:
ieee80211n=1 -> enable 802.11n support for improved performance on modern devices.
ap_isolate=1 -> enable client isolation so IoT devices communicate only with the monitoring server and not with each other.
Now, point the hostapd daemon to the configuration file by updating /etc/default/hostapd with:
sudo sed -i 's|#DAEMON_CONF=""|DAEMON_CONF="/etc/hostapd/hostapd.conf"|' /etc/default/hostapd4.3 - Adding DHCP server settings.
The DHCP server must be configured to manage the subnet assigned to interface wlan1 and to provide the related network parameters. Edit /etc/dhcp/dhcp.conf and add the following block:
# Subnet served by wlan1 – Raspberry
subnet 192.168.50.0 netmask 255.255.255.0 {
  range 192.168.50.10 192.168.50.200;
  option routers 192.168.50.1;
  option subnet-mask 255.255.255.0;
  option broadcast-address 192.168.50.255;
}
To ensure that clients connecting to the Wi‑Fi network receive an IP address, the isc-dhcp-server service (which uses /etc/dhcp/dhcp.conf) must be instructed to listen on wlan1. Add or update the service configuration with:
INTERFACESv4="eth0 wlan1"4.4 - Assigning a static IP to wlan1, enabling the interface and AP.
It’s time to configure NetworkManager so that it does not fully manage wlan1, since hostapd and NetworkManager can conflict if both try to control the same interface. Marking wlan1 as unmanaged (with nmcli) prevents NetworkManager from overriding settings or accepting temporary DHCP leases:
sudo nmcli device set wlan1 managed noAdd the following block to /etc/NetworkManager/NetworkManager.conf (or the appropriate distribution file) to make the unmanaged rule for wlan1 permanent and to disable MAC address randomization during scans.
[main]
plugins=ifupdown,keyfile

[ifupdown]
managed=false

[device]
wifi.scan-rand-mac-address=no

[keyfile]
unmanaged-devices=interface-name:wlan1
🔍 In-depth
- Declaring wlan1 unmanaged avoids race conditions where NetworkManager takes control before hostapd or dhcpd configure the interface.
- Disabling scan MAC randomization (
wifi.scan-rand-mac-address=no) helps maintain consistent MAC behavior for AP operation and monitoring. - Assigning 192.168.50.1/24 to wlan1 matches the DHCP subnet previously configured for the AP. Adjust the address if a different subnet is used.
To make the static IP assignment for wlan1 persistent, the system must be instructed to apply the address automatically at each boot. Although a systemd service is a modern and elegant approach, it can introduce timing and dependency issues during hardware initialization that may prevent reliable IP assignment at boot; for this reason that approach is avoided here. A simpler and more reliable solution on Raspbian / Raspberry Pi OS is to use /etc/dhcpcd.conf. Append the following to the end of that file:
# Static configuration for AP on wlan1
interface wlan1
static ip_address=192.168.50.1/24
# do not set static routers or dns here for wlan1

interface eth0
nogateway
These rules ensure that wlan1 always has the AP address before hostapd and isc‑dhcp‑server start. They also prevent dhcpcd from assigning a gateway on eth0, avoiding overwriting the default route when another interface (for example wlan0) must act as the Internet gateway. Together with the change in NetworkManager.conf (which declares wlan1 unmanaged), these settings prevent multiple agents (NetworkManager, dhcpcd, hostapd) from interfering with each other and causing duplicate IP assignments or unwanted leases. At this point, restart the hostapd daemon:
sudo systemctl restart hostapdThen create or edit the systemd override for the DHCP service at /etc/systemd/system/isc-dhcp-server.service.d/override.conf and add the unit dependencies:
[Unit]
After=network-online.target NetworkManager.service dhcpcd.service hostapd.service
Requires=network-online.target hostapd.service
This forces systemd to start the DHCP server only after the network is considered online and the AP (hostapd) is running, preventing the DHCP service from starting when its prerequisites are not met. The access point and all required services are now running and is possible to connect target devices to perform dynamic monitoring. To ensure every necessary service will start automatically after the next reboot, verify their enabled state:
systemctl is-enabled hostapd wlan1-static isc-dhcp-serverThe command should return enabled three times. With the services enabled and the AP active, the system is ready to monitor traffic on wlan1 as well as eth0. Test connectivity and capture traffic with:
sudo tcpdump -i wlan1💡 Tip
Sometimes the Wi‑Fi and Ethernet interfaces are up but the DHCP server does not assign IP addresses; in that case, first reload systemd and restart the DHCP service:
sudo systemctl daemon-reload
sudo systemctl restart isc-dhcp-server
This quick step often restores DHCP operation but, if the problem persists, check:
# verify the service status:
sudo systemctl status isc-dhcp-server

# check the logs for errors:
sudo journalctl -u isc-dhcp-server --no-pager -n 200

# check the lease file to see whether leases have been issued:
sudo cat /var/lib/dhcp/dhcpd.leases
These commands help identify whether the problem is caused by missing dependencies, interfaces that are not ready, configuration errors in the file, or permissions/locks on the lease file.